
Elevation input
Turn a 2D elevation into a realistic facade render
Upload a 2D elevation, CAD export or hand drawing, and ArchFor renders it as a realistic facade seen straight-on. Proportions and openings stay as drawn; materials, light and sky are added.
- The view stays flat and frontal, with no added perspective
- An elevation is always rendered as an exterior
- Four facade options per click, usually under a minute at 2K
Updated November 3, 2026
Before and after
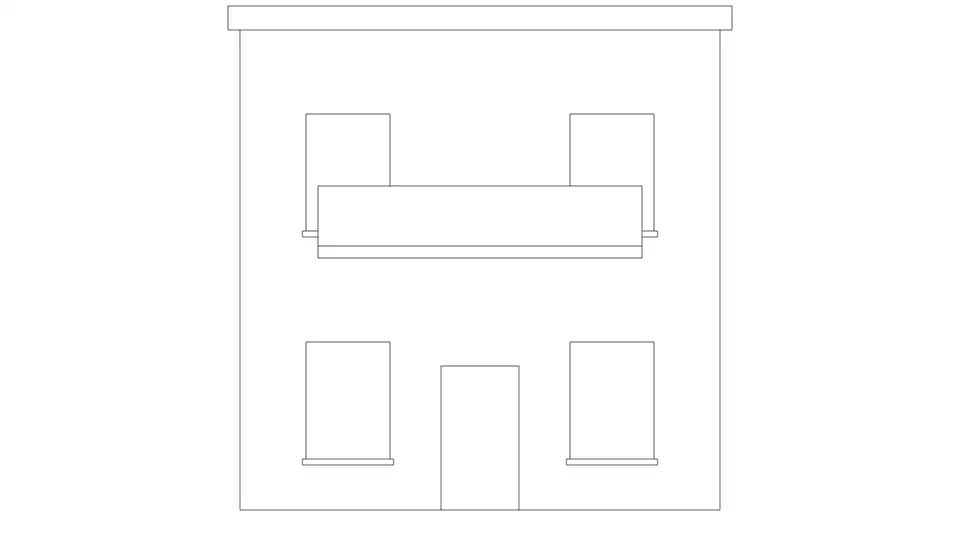
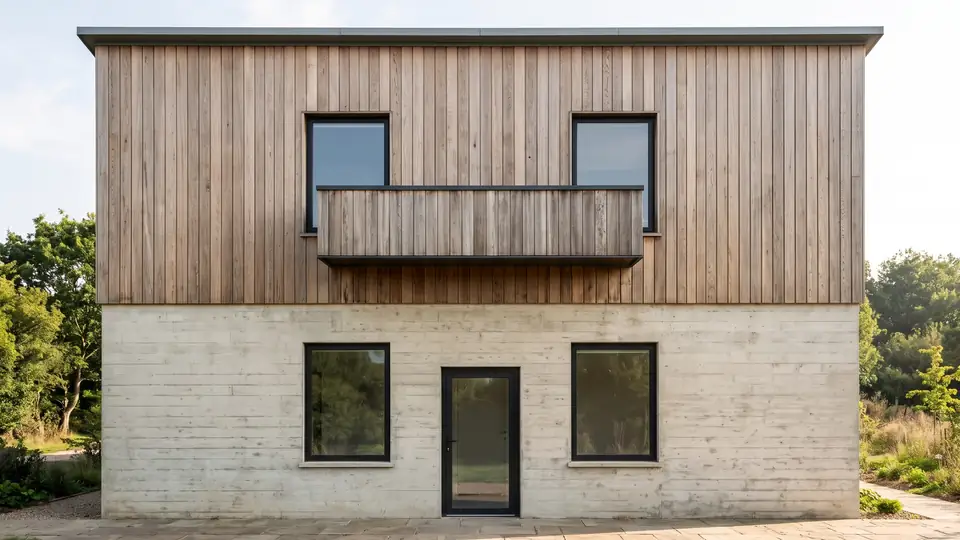
Test model, Nano Banana 2.1 at 2K, not retouched. How we tested
Three steps, nothing to set up
- 01
Screenshot your view
In SketchUp use File → Export → 2D Graphic, or just take a screenshot. Shadows on, axes and edges off.
- 02
Pick a style and a time of day
Six style presets, checked in our recipe test. Add a one-line materials note if you want.
- 03
Choose from four options
Download the one you like, or tap Brighter, Night or Add people & planting to get four more based on it.
How to export a clean elevation from AutoCAD or Revit
The cleaner the sheet, the cleaner the facade. Annotation is drawn into the image as if it were part of the building, so strip it before export.
In AutoCAD for Windows, plot the elevation with the PublishToWeb PNG.pc3 device and set the paper size in pixels. If your version has no PNG plotter, plot to PDF and save the page as PNG. In Revit, open the elevation view and use File > Export > Images and Animations > Image.
- Duplicate the elevation view or layout so the original sheet stays intact.
- Freeze or hide layers and categories for dimensions, text, tags, grid lines and level markers.
- Leave the title block and border out of the plot area.
- Plot or export at least 2,000 pixels on the long side, on a white background.
- In Revit, set Export Range to Current window and tick Hide crop boundaries and Hide ref/work planes.
- Upload the PNG and choose Elevation as the input.
How does the AI read hatching and line weight?
Hatching is read as modest depth and texture, not as a literal pattern. A brick hatch suggests masonry; a dense poché hints at a reveal or recess. Heavier lines read as edges that sit forward: sills, frames, roof overhangs.
If a hatch stands for a specific material, say so in the one-line materials note, for example "hatched panels are dark standing-seam metal". The note sets finishes only and cannot move openings.
| Drawing element | How it is read |
|---|---|
| Thick outline | Building edge or projecting element |
| Hatch or tone | Material texture and shallow depth |
| Window frame lines | Glazing with frames, depth guessed |
| Ground line | Grade, paving or lawn |
| Dimensions and text | Often rendered as marks on the facade; remove them |
What stays the same and what changes?
The elevation recipe keeps the camera straight-on with no perspective and no change of proportions. Window and door positions, floor heights and the roof profile come from your drawing.
What changes is everything a line drawing does not carry: material color, reflections in glass, shadow under eaves, sky and planting at the base. Thin details such as mullions or balcony balusters can shift a little between options. Text on the facade is unreliable. Use the results for design reviews and client boards, not for permit or construction sets.
Refining a facade after the first round
Choose the option you like and use Change facade material to try vertical cedar boards, smooth white render, board-formed concrete, red clay brick, dark standing-seam metal or pale limestone panels. Night is one click on any result; for Golden hour, render the elevation again with that time of day. Each costs 8 credits at 2K.
ArchFor is a web app that turns 3D model screenshots, sketches and existing renders into photorealistic architectural images. Credit packs from $9.99; no plugin and no subscription required.
ArchFor at a glance
- What it is
- ArchFor is a web app that turns 3D model screenshots, sketches and existing renders into photorealistic architectural images. Credit packs from $9.99; no plugin and no subscription required.
- Inputs
- One JPG, PNG or WebP up to 10 MB: a model screenshot, clay model, hand sketch or elevation from any software
- Output
- Four images per click at the size you choose (1K, 2K or 4K; 2K by default), in the shape of your upload
- Time
- Usually under a minute at 2K; 4K takes a minute or more
- Price
- 1 credit per image at 1K, 2 at 2K, 3 at 4K. Packs from $9.99 for 80 credits (40 images at 2K); monthly plans from $19.99; no free tier
- Model
- Nano Banana 2.1, a Google Gemini image model (ArchFor isn't affiliated with Google)
- Privacy
- Uploads and results are private and deleted after 14 days
Pay for what you render
No subscription needed. Failed renders are refunded automatically.
Questions
Should I remove dimensions first?
Yes. Dimensions, text, grid bubbles and title blocks are drawn into the facade as stray marks. Hide those layers or categories before you plot.
Can I get a perspective view from an elevation?
No. The elevation stays flat and frontal by design. For a perspective, upload a 3D view or sketch and pick Model screenshot or Hand sketch instead.
How is hatching handled?
It is read as shallow depth and surface texture. To pin a hatched area to one material, name it in the materials note.
Does a hand-drawn elevation work?
Yes. Draw it with a ruler, keep the ground line visible, and photograph the sheet flat. Wavering verticals may come through as slightly uneven walls.
Can I render a section the same way?
Not reliably. The recipe expects an outside face of a building. A cut section mixes interior and exterior, and the result often looks like an odd facade.